
[win8] スタート画面のタイルを動的に作成する(前哨戦) | Moonmile Solutions Blog
http://www.moonmile.net/blog/archives/3443
からちょっと横道に逸れて、画像データ(BitmapImage)に直接書き込む方法を紹介しておきます。
metro の Image コントロールには Source プロパティに BitmapImage オブジェクトを直接指定できます。BitmapImage オブジェクトは画像ファイルから指定もできるのですが、直接メモリから作ることもできます、ってことです。単純なところでは、こんな感じ。
private async void Button_Click_2(object sender, RoutedEventArgs e)
{
	var mem = new InMemoryRandomAccessStream();
	var enc = await BitmapEncoder.CreateAsync(BitmapEncoder.PngEncoderId, mem);

	int width = 140, height = 140;
	int plane = 4;
	byte[] data = new byte[width * height * plane];
	int offset = 0;
	for (int y = 0; y < width; y++)
	{
		for (int x = 0; x < height; x++)
		{
			data[offset + 0] = 0xFF; // R
			data[offset + 1] = 0x00; // G
			data[offset + 2] = 0x00; // B
			data[offset + 3] = 0xFF; // Alpha
			offset += 4;
		}
	}
	enc.SetPixelData(BitmapPixelFormat.Rgba8, BitmapAlphaMode.Straight,
		(uint)width, (uint)height, 96, 96, data);
	await enc.FlushAsync();

	BitmapImage bmp = new BitmapImage();
	bmp.SetSource(mem);
	image1.Source = bmp;
}
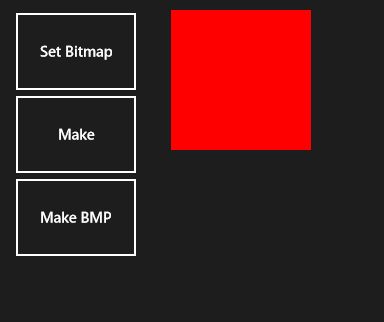
これを実行すると、140×140 の矩形が赤で塗りつぶされます(これ自体のサンプルがあたのですが、URLを忘却。見つけたら記録しておきます)。
メモリ上で操作する場合は、byte[] と InMemoryRandomAccessStream を使います。このあたりいくつかの方法があるのですが、結論から言えば「方法」自体はどうでもよくて、.NET Framework のように System.Drawing が使えると便利なんですけどねぇ、という具合です。
こんな風に色を塗りつぶすだけならば簡単にでるし、画像を貼りつけることも可能です。回転などのメソッドもあったので、そのくらいはできそうなのですが、根本的に機能不足は否めません。
なので、先の記事のように DirectX を直接扱います。 DirectX は C++/CX から扱うことになるので、C#やVBのプログラマには辛いところがあります。また、C++/CX から直接.NET Framework を扱えない(C#を経由して扱うことは可能)なので、これも痛しかゆしという具合です。なので、本格的なゲームを作る場合には全画面を DirectX を使うのが良いのでしょうが、ちょっとしたパズルゲームや画像の加工ツールぐらいならば、
- DirectX を扱う画像加工は C++/CX に押し込める
- UI を扱う部分は C# で扱う
分け方をするほうがベターです。
ひとまず、全ソースは github からダウンロードできます。
win8/DynamicMakeWritableBitmap
https://github.com/moonmile/win8/tree/master/DynamicMakeWritableBitmap
余計なところは随分削ったつもりなのですが、まだライブラリにするには冗長な感じなので、いまいちなのですが。Direct2D アプリケーションを作る時に自動作成される DirectXBase.* から抜き出してきたのが、次のソースです。
#pragma once

namespace DX
{
    inline void ThrowIfFailed(HRESULT hr)
    {
        if (FAILED(hr))
        {
            // Set a breakpoint on this line to catch DirectX API errors
            throw Platform::Exception::CreateException(hr);
        }
    }
}

namespace MakeBitmapLib
{
    public ref class DXBitmap sealed
    {
    public:
        DXBitmap();
		void Initialize();
		Platform::Array<unsigned char>^ MakeText( Platform::String^ text );

protected:
    // Direct2D Objects
    Microsoft::WRL::ComPtr<ID2D1Factory1>          m_d2dFactory;
    Microsoft::WRL::ComPtr<ID2D1Device>            m_d2dDevice;
    Microsoft::WRL::ComPtr<ID2D1DeviceContext>     m_d2dContext;
    Microsoft::WRL::ComPtr<ID2D1Bitmap1>           m_d2dTargetBitmap;

    // DirectWrite & Windows Imaging Component Objects
    Microsoft::WRL::ComPtr<IDWriteFactory1>        m_dwriteFactory;
    Microsoft::WRL::ComPtr<IWICImagingFactory2>    m_wicFactory;

    // Direct3D Objects
    Microsoft::WRL::ComPtr<ID3D11Device1>          m_d3dDevice;
    Microsoft::WRL::ComPtr<ID3D11DeviceContext1>   m_d3dContext;
    Microsoft::WRL::ComPtr<IDXGISwapChain1>        m_swapChain;
    Microsoft::WRL::ComPtr<ID3D11RenderTargetView> m_renderTargetView;
    Microsoft::WRL::ComPtr<ID3D11DepthStencilView> m_depthStencilView;

	D3D_FEATURE_LEVEL                              m_featureLevel;
    Windows::Foundation::Size                      m_renderTargetSize;
    Windows::Foundation::Rect                      m_windowBounds;
    Windows::UI::Core::CoreWindow^                 m_window;
    float                                          m_dpi;
	};
}
protected なところは、DirectX 関係で触る COM ですね。余分なところも初期化されてしまいますが、まぁ、そのままコピーしてき持ってきています。
そして、この DirectX を扱う為のヘッダファイルを pch.h に入れておきます。pch.h はプリコンパイルヘッダなので、固定化されているヘッダファイルを突っ込んでおきます。
#pragma once
</p>
<p>
#include <wrl.h>
#include <d3d11_1.h>
#include <d2d1_1.h>
#include <d2d1effects.h>
#include <dwrite_1.h>
#include <wincodec.h>
C++ のソースコードは次な感じですね。Initialize メソッドで初期化しておいて、MakeText メソッドで画像を作成します。Initialize メソッドの中身は DirectXBase.cpp のものを適宜コピーして使っています。
// WinRTComponent.cpp
#include "pch.h"
#include "WinRTComponent.h"

using namespace MakeBitmapLib;
using namespace Platform;
using namespace Microsoft::WRL;
using namespace Windows::UI::Core;
using namespace Windows::Foundation;
using namespace D2D1;
using namespace Windows::Storage::Streams;

DXBitmap::DXBitmap()
{
}
void DXBitmap::Initialize()
{
	// CreateDeviceIndependentResources
    D2D1_FACTORY_OPTIONS options;
    ZeroMemory(&options, sizeof(D2D1_FACTORY_OPTIONS));

#if defined(_DEBUG)
     // If the project is in a debug build, enable Direct2D debugging via SDK Layers.
    options.debugLevel = D2D1_DEBUG_LEVEL_INFORMATION;
#endif

    DX::ThrowIfFailed(
        D2D1CreateFactory(
            D2D1_FACTORY_TYPE_SINGLE_THREADED,
            __uuidof(ID2D1Factory1),
            &options,
            &m_d2dFactory
            )
        );

    DX::ThrowIfFailed(
        DWriteCreateFactory(
            DWRITE_FACTORY_TYPE_SHARED,
            __uuidof(IDWriteFactory),
            &m_dwriteFactory
            )
        );

	DX::ThrowIfFailed(
        CoCreateInstance(
            CLSID_WICImagingFactory,
            nullptr,
            CLSCTX_INPROC_SERVER,
            IID_PPV_ARGS(&m_wicFactory)
            )
        );

    // This flag adds support for surfaces with a different color channel ordering than the API default.
    // It is recommended usage, and is required for compatibility with Direct2D.
    UINT creationFlags = D3D11_CREATE_DEVICE_BGRA_SUPPORT;

#if defined(_DEBUG)
    // If the project is in a debug build, enable debugging via SDK Layers with this flag.
    creationFlags |= D3D11_CREATE_DEVICE_DEBUG;
#endif

    // This array defines the set of DirectX hardware feature levels this app will support.
    // Note the ordering should be preserved.
    // Don't forget to declare your application's minimum required feature level in its
    // description.  All applications are assumed to support 9.1 unless otherwise stated.
    D3D_FEATURE_LEVEL featureLevels[] =
    {
        D3D_FEATURE_LEVEL_11_1,
        D3D_FEATURE_LEVEL_11_0,
        D3D_FEATURE_LEVEL_10_1,
        D3D_FEATURE_LEVEL_10_0,
        D3D_FEATURE_LEVEL_9_3,
        D3D_FEATURE_LEVEL_9_2,
        D3D_FEATURE_LEVEL_9_1
    };

    // Create the DX11 API device object, and get a corresponding context.
    ComPtr<ID3D11Device> d3dDevice;
    ComPtr<ID3D11DeviceContext> d3dContext;
    DX::ThrowIfFailed(
        D3D11CreateDevice(
            nullptr,                  // specify null to use the default adapter
            D3D_DRIVER_TYPE_HARDWARE,
            nullptr,                  // leave as nullptr unless software device
            creationFlags,            // optionally set debug and Direct2D compatibility flags
            featureLevels,            // list of feature levels this app can support
            ARRAYSIZE(featureLevels), // number of entries in above list
            D3D11_SDK_VERSION,        // always set this to D3D11_SDK_VERSION for modern
            &d3dDevice,               // returns the Direct3D device created
            &m_featureLevel,          // returns feature level of device created
            &d3dContext               // returns the device immediate context
            )
        );

    // Get the DirectX11.1 device by QI off the DirectX11 one.
    DX::ThrowIfFailed(
        d3dDevice.As(&m_d3dDevice)
        );

    // And get the corresponding device context in the same way.
    DX::ThrowIfFailed(
        d3dContext.As(&m_d3dContext)
        );

    // Obtain the underlying DXGI device of the Direct3D11.1 device.
    ComPtr<IDXGIDevice> dxgiDevice;
    DX::ThrowIfFailed(
        m_d3dDevice.As(&dxgiDevice)
        );

    // Obtain the Direct2D device for 2D rendering.
    DX::ThrowIfFailed(
        m_d2dFactory->CreateDevice(dxgiDevice.Get(), &m_d2dDevice)
        );

    // And get its corresponding device context object.
    DX::ThrowIfFailed(
        m_d2dDevice->CreateDeviceContext(
            D2D1_DEVICE_CONTEXT_OPTIONS_NONE,
            &m_d2dContext
            )
        );

    // Save the DPI of this display in our class.
    m_d2dContext->SetDpi(m_dpi, m_dpi);

    // Release the swap chain (if it exists) as it will be incompatible with
    // the new device.
    m_swapChain = nullptr;

}
Platform::Array<unsigned char>^ DXBitmap::MakeText( Platform::String^ text )
{
	IWICStream *pStream = NULL;
    IWICBitmapEncoder *pEncoder = NULL;
    IWICBitmapFrameEncode *pFrameEncode = NULL;
    static const UINT sc_bitmapWidth = 140;
    static const UINT sc_bitmapHeight = 140;
    IWICBitmap *pWICBitmap = NULL;
    ID2D1RenderTarget *pRT = NULL;
    IDWriteTextFormat *pTextFormat = NULL;
    ID2D1SolidColorBrush *pBlackBrush = NULL;

	DX::ThrowIfFailed(
		m_wicFactory->CreateBitmap(
            sc_bitmapWidth,
            sc_bitmapHeight,
            GUID_WICPixelFormat32bppBGR,
            WICBitmapCacheOnLoad,
            &pWICBitmap
			));

	DX::ThrowIfFailed(
        m_d2dFactory->CreateWicBitmapRenderTarget(
            pWICBitmap,
            D2D1::RenderTargetProperties(),
            &pRT
            ));

        pRT->BeginDraw();
        pRT->Clear(D2D1::ColorF(D2D1::ColorF::White));
        D2D1_SIZE_F rtSize = pRT->GetSize();

		// static const WCHAR sc_fontName[] = L"Calibri";
		static const WCHAR sc_fontName[] = L"HGP明朝E";
        static const FLOAT sc_fontSize = 32;

        m_dwriteFactory->CreateTextFormat(
            sc_fontName,
            NULL,
            DWRITE_FONT_WEIGHT_NORMAL,
            DWRITE_FONT_STYLE_NORMAL,
            DWRITE_FONT_STRETCH_NORMAL,
            sc_fontSize,
            L"", //locale
            &pTextFormat
            );

        pRT->CreateSolidColorBrush(
            D2D1::ColorF(D2D1::ColorF::Black),
            &pBlackBrush
            );

        pRT->DrawText(
			text->Data(),
			text->Length(),
            pTextFormat,
            D2D1::RectF(0, 0, rtSize.width, rtSize.height),
            pBlackBrush);

		pRT->EndDraw();

    // Save image to file
    DX::ThrowIfFailed(
		m_wicFactory->CreateStream(&pStream));

    WICPixelFormatGUID format = GUID_WICPixelFormatDontCare;
    //    static const WCHAR filename[] = L"output.png";

	unsigned char buff[sc_bitmapWidth*sc_bitmapHeight*4];

//	DX::ThrowIfFailed(
//		pStream->InitializeFromFilename(filename, GENERIC_WRITE));
	DX::ThrowIfFailed(
		pStream->InitializeFromMemory( buff, sizeof(buff)));
    DX::ThrowIfFailed(
		m_wicFactory->CreateEncoder(GUID_ContainerFormatPng, NULL, &pEncoder));
	DX::ThrowIfFailed(
        pEncoder->Initialize(pStream, WICBitmapEncoderNoCache));
    DX::ThrowIfFailed(
        pEncoder->CreateNewFrame(&pFrameEncode, NULL));
	DX::ThrowIfFailed(
		pFrameEncode->Initialize(NULL));
	DX::ThrowIfFailed(
        pFrameEncode->SetSize(sc_bitmapWidth, sc_bitmapHeight));
    DX::ThrowIfFailed(
        pFrameEncode->SetPixelFormat(&format));
    DX::ThrowIfFailed(
        pFrameEncode->WriteSource(pWICBitmap, NULL));
	DX::ThrowIfFailed(
        pFrameEncode->Commit());
	DX::ThrowIfFailed(
        pEncoder->Commit());

	Platform::Array<unsigned char>^ buffer = ref new Platform::Array<unsigned char>(sizeof(buff));
	for( int i=0; i<sizeof(buff); i++ ) {
		buffer[i] = buff[i];
	}
	return buffer;
}
最後の byte[] から array に移し替えるのがダサいのですが、まあ暫定的にこうしておきます。適当なコピーメソッドが見当たらなかったので。
実は、ここで問題なのは buff のサイズなのですが、勝手に width * height * 4 と決めつけています。コードを見るとわかりますが、BITMAP 形式から PNG 形式に変換しているので、サイズが正しくないのですよね。このあたり、は改修が必要です。
そうそう、ビルドをするときには、DirectX のライブラリが必要です。リンカーの入力として、以下のライブラリを追加しておきます。
d2d1.lib
d3d11.lib
dxgi.lib
ole32.lib
windowscodecs.lib
dwrite.lib
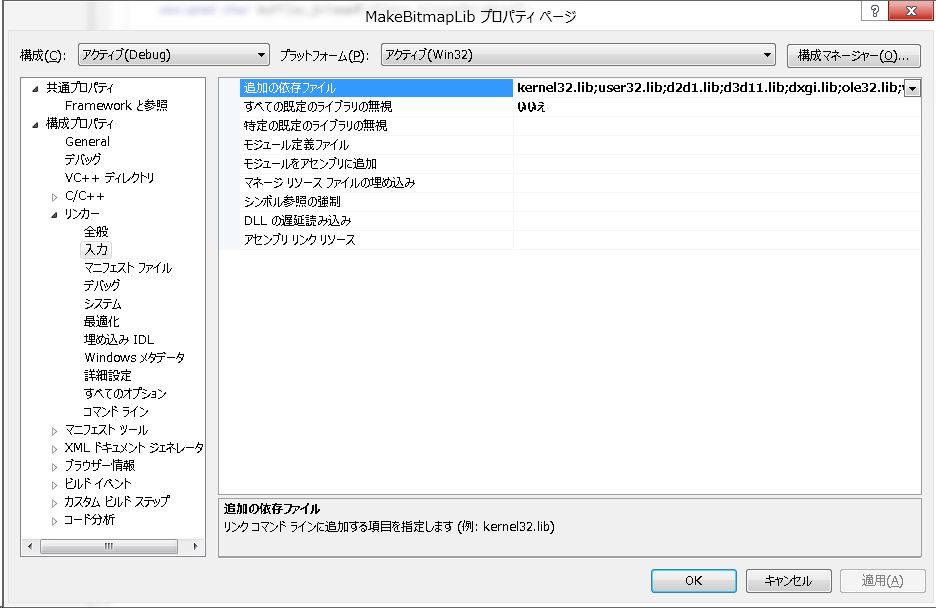
面倒な場合は、以下を直接貼り付けてしまってください。これは Direct2D アプリケーションで使っているライブラリと同じです。
kernel32.lib;user32.lib;d2d1.lib;d3d11.lib;dxgi.lib;ole32.lib;windowscodecs.lib;dwrite.lib;%(AdditionalDependencies)
さて、これで C++/CX ライブラリのほうは準備ができたので、このライブラリを利用する C# のコードを書きます。
using Windows.UI.Xaml.Media.Imaging;
using Windows.Storage;
using Windows.Storage.Streams;
using Windows.Graphics.Imaging;
using System.Runtime.InteropServices.WindowsRuntime;

private async void Button_Click_3(object sender, RoutedEventArgs e)
{
	var dxbmp = new MakeBitmapLib.DXBitmap();
	dxbmp.Initialize();
	byte[] data = dxbmp.MakeText("あれこれ");

	var mem = new InMemoryRandomAccessStream();
	await mem.WriteAsync(data.AsBuffer());
	// await mem.FlushAsync();
	BitmapImage bmp = new BitmapImage();
	bmp.SetSource(mem);
	image1.Source = bmp;
}
using がたくさんありますが、これが必須なのですよね~。このあたりの微妙なところもあって若干使いづらいのですが、これで文字が書けます。
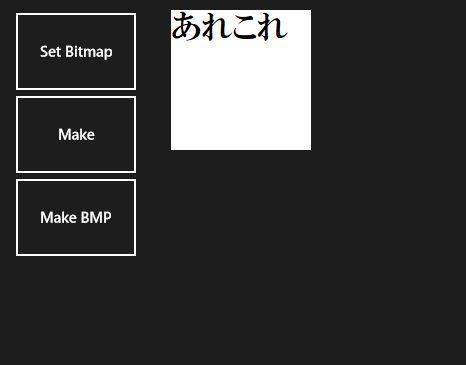
まあ、字だけではつまらないので、そのうちに画像も付けておきます。
さて、C# のコードですが思ったよりも複雑ですよね。実は本来ならば、次のようなコードにしたいのです。
private void Button_Click_3(object sender, RoutedEventArgs e)
{
	var dxbmp = new MakeBitmapLib.DXBitmap();
	dxbmp.Initialize();
	image1.Source = dxbmp.MakeText("あれこれ");
}
こうするとすっきりして、これならばライブラリとして使えそうな感じですよね~。何故、こうしないか/こうできなかったかというと、
- WriteAsync メソッドが非同期なので、async/await を作らないといけない。
- async/await の使い方はわかったけど、「作り方」が分からない。
- なので、メソッドに括り出すことができない。
- 更に、C++/CX で async/await を作り方が分からない。
ってな訳なんですよね~。
という訳で、単なる画像加工にも非同期が関わってしまうというややこしさなのですが、まぁ、このあたりはもうちょっと調べていきましょうか。

間違った
InitializeFromFilename は 最後以外は InitializeFromMemoryの間違いでした。(__;
ピンバック: WindowsストアアプリでDirect2D描画のRGB値を得る方法を考えてみた。 « M-AE、山科駐在員のブログ