Windows Remote Arduino を Arduino Uno/Nano で試す | Moonmile Solutions Blog
http://www.moonmile.net/blog/archives/7158
の続きです。Arduino に Firmata を入れることによってクロスプラットフォームで Arduino をリモート操作することが可能です。ということで、手元にある Arduino 戦車に Firmata を入れ直し、Windows Remote Arduino を使ってタブレットから動かしてみます。
L293D 利用して Arduino 戦車を作る | Moonmile Solutions Blog で作った Arduino 戦車は自前で シリアル通信部分を書いているのですが、Firmata のフォーマットに直せば、Ruby とか Node.js からも動かせるようになりますよね。そのあたりの相互通信は Alljoyn でやるようになるハズなのですが、ひとまず Firmata で動かします(デファクトスタンダードっぽいし)。

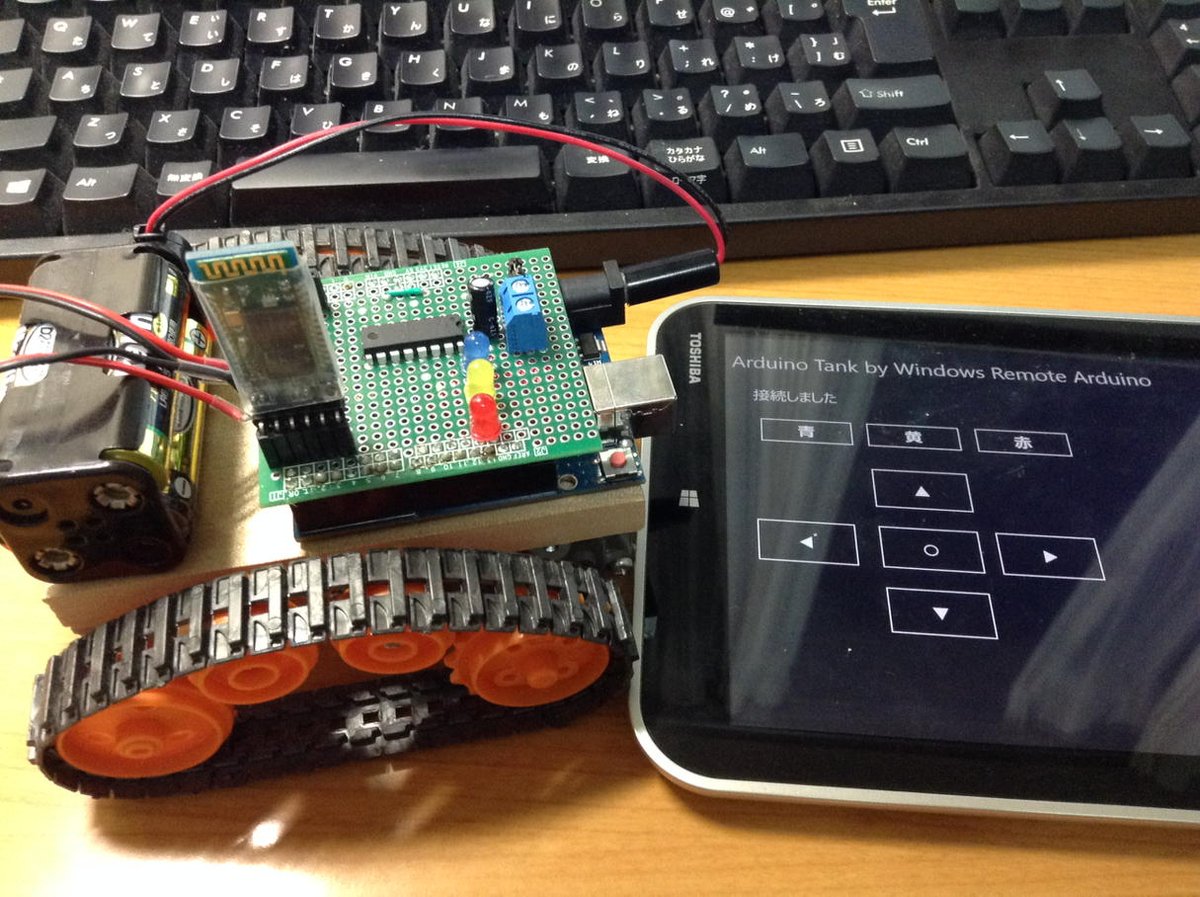
こんな感じの UI を作って、ボタンをタップして Arduino 戦車を動かします。コードで、AddHandler しているのは、ボタンをタップしている間だけモーターを動かしたかったからです。途中で通信が暴走すると、戦車自体が暴走してしまうので、デフォルトで戦車が止まるようにしました。
プロジェクト構成は、Microsoft.Maker.* をソリューションに加えてビルド。メインの ArduinoTankFirmata プロジェクトから各プロジェクトを参照設定しておきます。

ざっと書いたのが以下のコードです。Arduino 戦車の Bluetooth モジュールの名前が「HC-05」になっています。モータ駆動のためのピン(5-7,8-10)をいちいち制御しないといけませんが、Arduino の Sketch と同じように書くことができます。
public sealed partial class MainPage : Page
{
    BluetoothSerial bluetooth;
    RemoteDevice arduino;

    public MainPage()
    {
        this.InitializeComponent();
        this.Loaded += MainPage_Loaded;

        foreach (var b in new Button[] { ledRed, ledYellow, ledBlue })
        {
            b.AddHandler(PointerPressedEvent, new PointerEventHandler(OnLedPressed), true);
            b.AddHandler(PointerReleasedEvent, new PointerEventHandler(OnLedReleased), true);
        }
        tankStop.Click += (s, e) => { MotorLeftStop(); MotorRightStop(); };
        foreach (var b in new Button[] { tankForward, tankBack, tankLeft, tankRight })
        {
            b.AddHandler(PointerPressedEvent, new PointerEventHandler(OnTankPressed), true);
            b.AddHandler(PointerReleasedEvent, new PointerEventHandler(OnTankReleased), true);
        }

    }

    void MainPage_Loaded(object sender, RoutedEventArgs e)
    {
        bluetooth = new BluetoothSerial("HC-05");
        arduino = new RemoteDevice(bluetooth);
        bluetooth.ConnectionEstablished += bluetooth_ConnectionEstablished;
        bluetooth.begin(9600, SerialConfig.SERIAL_8N1);
    }

    async void bluetooth_ConnectionEstablished()
    {
        await Dispatcher.RunAsync(Windows.UI.Core.CoreDispatcherPriority.Normal, () => {
            this.textStatus.Text = "接続しました";
        });
    }

    const int pinLedRed = 13;
    const int pinLedYellow = 12;
    const int pinLedBlue = 11;

    const int pinMotorAPower = 10;
    const int pinMotorAOut1 = 9;
    const int pinMotorAOut2 = 8;
    const int pinMotorBPower = 5;
    const int pinMotorBOut1 = 6;
    const int pinMotorBOut2 = 7;

    void OnLedPressed(object sender, PointerRoutedEventArgs e)
    {
        if (sender == ledRed) arduino.digitalWrite(pinLedRed, PinState.HIGH);
        if (sender == ledYellow) arduino.digitalWrite(pinLedYellow, PinState.HIGH);
        if (sender == ledBlue) arduino.digitalWrite(pinLedBlue, PinState.HIGH);
    }
    void OnLedReleased(object sender, PointerRoutedEventArgs e)
    {
        if (sender == ledRed) arduino.digitalWrite(pinLedRed, PinState.LOW);
        if (sender == ledYellow) arduino.digitalWrite(pinLedYellow, PinState.LOW);
        if (sender == ledBlue) arduino.digitalWrite(pinLedBlue, PinState.LOW);
    }

    void OnTankPressed(object sender, PointerRoutedEventArgs e)
    {
        if (sender == tankForward) { MotorLeftForward(); MotorRightForward(); };
        if (sender == tankBack) { MotorLeftBack(); MotorRightBack(); };
        if (sender == tankLeft) { MotorLeftBack(); MotorRightForward(); };
        if (sender == tankRight) { MotorLeftForward(); MotorRightBack(); };

    }
    void OnTankReleased(object sender, PointerRoutedEventArgs e)
    {
        MotorLeftStop();
        MotorRightStop();
    }

    void MotorLeftStop()
    {
        arduino.digitalWrite( pinMotorAPower, PinState.LOW );
        arduino.digitalWrite(pinMotorAOut1, PinState.LOW);
        arduino.digitalWrite(pinMotorAOut2, PinState.LOW);
    }
    void MotorLeftForward()
    {
        arduino.digitalWrite(pinMotorAPower, PinState.HIGH);
        arduino.digitalWrite(pinMotorAOut1, PinState.LOW);
        arduino.digitalWrite(pinMotorAOut2, PinState.HIGH);
    }
    void MotorLeftBack()
    {
        arduino.digitalWrite(pinMotorAPower, PinState.HIGH);
        arduino.digitalWrite(pinMotorAOut1, PinState.HIGH);
        arduino.digitalWrite(pinMotorAOut2, PinState.LOW);
    }
    void MotorRightStop()
    {
        arduino.digitalWrite(pinMotorBPower, PinState.LOW);
        arduino.digitalWrite(pinMotorBOut1, PinState.LOW);
        arduino.digitalWrite(pinMotorBOut2, PinState.LOW);
    }
    void MotorRightForward()
    {
        arduino.digitalWrite(pinMotorBPower, PinState.HIGH);
        arduino.digitalWrite(pinMotorBOut1, PinState.LOW);
        arduino.digitalWrite(pinMotorBOut2, PinState.HIGH);
    }
    void MotorRightBack()
    {
        arduino.digitalWrite(pinMotorBPower, PinState.HIGH);
        arduino.digitalWrite(pinMotorBOut1, PinState.HIGH);
        arduino.digitalWrite(pinMotorBOut2, PinState.LOW);
    }
}
このプログラムを、去年の de:code で貰った Toshiba のタブレットに入れて動作確認してます。Toshiba タブレットに Windows 10 IP を入れようとしたのですが、失敗してしまったので、Windows 8.1 になります。
ライントレースのような自律的な動きをする場合は、Firmata 経由では冗長な処理になっていしまうのですが(センサーを BT で飛ばして PC で制御するというスタイルになるので)、Arduino のセンシングデータをそのまま送ってきたり、今回のようにユーザーが直接コントロールする場合には、さっくりと作れてよさそうです。GPIO の使い方は Sketch に似ているんですが、個人的には .NET micro 風にしてもよかったのでは?と思っていますが。まあ、そのあたりは自分で拡張メソッドを作ればよいわけで、その辺はいずれ。