Arduino で Bluetooth シリアル変換モジュール(HC-05)を使う | Moonmile Solutions Blog
http://www.moonmile.net/blog/archives/6819
の続きです。
ストアアプリで作ると、ノートPCでちまちま(Surfaceでもいいけど)やらないちけないので、スマートフォンから動かせるようにします。と言いますか、せっかく Xamarin.Android があるんだから、それで RFCOMM してしまおうという訳です。
最近、中古で購入した Galaxy S3 は、Android 4.1.2 までしか上がらないので BLE は使えないのですが、従来の Bluetooth は使えます。まあ、接続先が Bluetooth 2.0 でシリアル通信なのでこれでok。
内容的には、以下を参考にして作っています。
Connect to a Bluetooth Serial Device with Xamarin.Android
http://brianpeek.com/post/Connect-to-a-Bluetooth-Device-with-XamarinAndroid
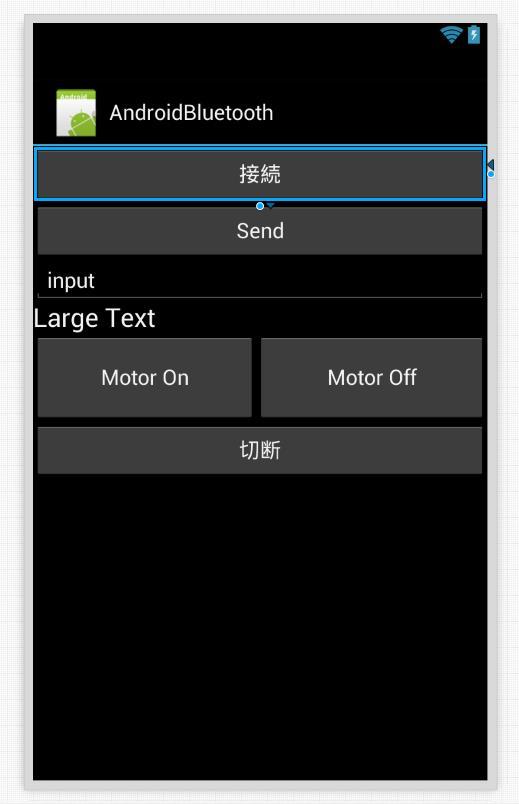
Android アプリの画面はこんな感じ。
Android で RFCOMM を使う
Xamarin.Forms を使うと、何故か Android.Bluetooth 名前空間が参照できないので、ノーマルな Xamarin.Forms で作っています。
BluetoothAdapter.DefaultAdapter でデフォルトの Bluetooth を取ってきて、CreateRfcommSocketToServiceRecord メソッドで RFCOMM 用のソケットを作ります。データの送受信はこれに対して、OutputStream と InputStream を使えば ok です。
[Activity(Label = "AndroidBluetooth", MainLauncher = true, Icon = "@drawable/icon")]
public class MainActivity : Activity
{
	TextView text1;
	EditText edit1;
	protected override void OnCreate(Bundle bundle)
	{
		base.OnCreate(bundle);

		// Set our view from the "main" layout resource
		SetContentView(Resource.Layout.Main);

		// Get our button from the layout resource,
		// and attach an event to it
		Button button = FindViewById<Button>(Resource.Id.MyButton);
		button.Click += button_Click;
		Button btnSend = FindViewById<Button>(Resource.Id.button1);
		btnSend.Click += btnSend_Click;
		text1 = FindViewById<TextView>(Resource.Id.textView1);
		edit1 = FindViewById<EditText>(Resource.Id.editText1);
		Button btn2 = FindViewById<Button>(Resource.Id.button2);
		btn2.Click += btn2_Click;
		FindViewById<Button>(Resource.Id.button3).Click += clickMotorOn;
		FindViewById<Button>(Resource.Id.button4).Click += clickMotorOff;
	}

	BluetoothSocket _socket;
	/// <summary>
	/// 接続
	/// </summary>
	/// <param name="sender"></param>
	/// <param name="e"></param>
	async void button_Click(object sender, EventArgs e)
	{
		try
		{

			BluetoothAdapter adapter = BluetoothAdapter.DefaultAdapter;
			if (adapter == null)
				throw new Exception("No Bluetooth adapter found.");

			if (!adapter.IsEnabled)
				throw new Exception("Bluetooth adapter is not enabled.");

			BluetoothDevice device = (from bd in adapter.BondedDevices
										where bd.Name == "HC-05"
										select bd).FirstOrDefault();
			if (device == null)
				throw new Exception("Named device not found.");

			_socket = device.CreateRfcommSocketToServiceRecord(UUID.FromString("00001101-0000-1000-8000-00805f9b34fb"));
			await _socket.ConnectAsync();
			text1.Text = "接続しました";
		}
		catch (Exception ex)
		{
			text1.Text = ex.Message;
		}
	}

	async void SendCommand(string text)
	{
		// 8文字にして送る
		if (text.Length < 8)
		{
			text = text.PadRight(8, '*');
		}
		else
		{
			text = text.Substring(0, 8);
		}
		var buffer = System.Text.Encoding.UTF8.GetBytes(text);
		// 送信
		await _socket.OutputStream.WriteAsync(buffer, 0, buffer.Length);
		// 受信待ち
		var buffer2 = new byte[8];
		for (int i = 0; i < buffer2.Length; i++)
		{
			int n = _socket.InputStream.ReadByte();
			buffer2[i] = (byte)n;
		}
		string str = System.Text.Encoding.UTF8.GetString(buffer2);
		text1.Text = str;
	}

	/// <summary>
	/// 送信
	/// </summary>
	/// <param name="sender"></param>
	/// <param name="e"></param>
	void btnSend_Click(object sender, EventArgs e)
	{
		string text = edit1.Text ;
		SendCommand(text);
	}
	void clickMotorOn(object sender, EventArgs e)
	{
		string text = edit1.Text;
		SendCommand("m1on");
	}
	void clickMotorOff(object sender, EventArgs e)
	{
		string text = edit1.Text;
		SendCommand("m1off");
	}
	/// <summary>
	/// 切断
	/// </summary>
	/// <param name="sender"></param>
	/// <param name="e"></param>
	void btn2_Click(object sender, EventArgs e)
	{
		_socket.Close();
		_socket = null;
		text1.Text = "切断しました";
	}
}
コマンド自体は、Arduino が受けやすいように8バイト固定にしています。
実験して分かったのですが、Arduino からは1バイトずつ送っているので、受信する Android で ReadAsync を使うと最初の1バイトだけ先に受信してしまいます。このあたりはバッファを先読みして8バイト溜まったら読み込めばいいのですが、面倒ので1バイトずつ読み込んでいます。
		// 受信待ち
		var buffer2 = new byte[8];
		for (int i = 0; i < buffer2.Length; i++)
		{
			int n = _socket.InputStream.ReadByte();
			buffer2[i] = (byte)n;
		}
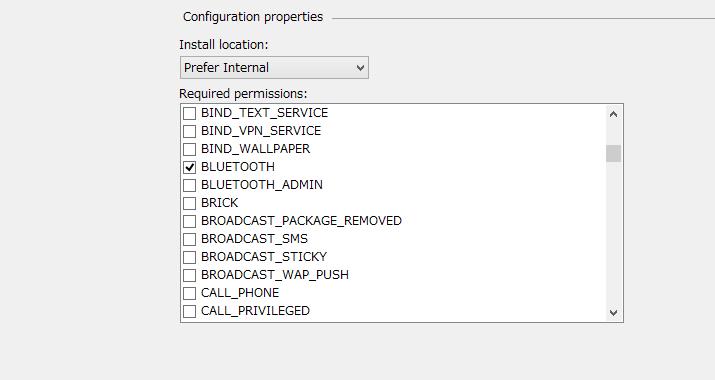
あと、プロジェクトの Android Manifest を開いて BLUETOOTH にチェックを入れます。
これがうまくいくと、Android スマートフォンからモーター制御ができるようになります。
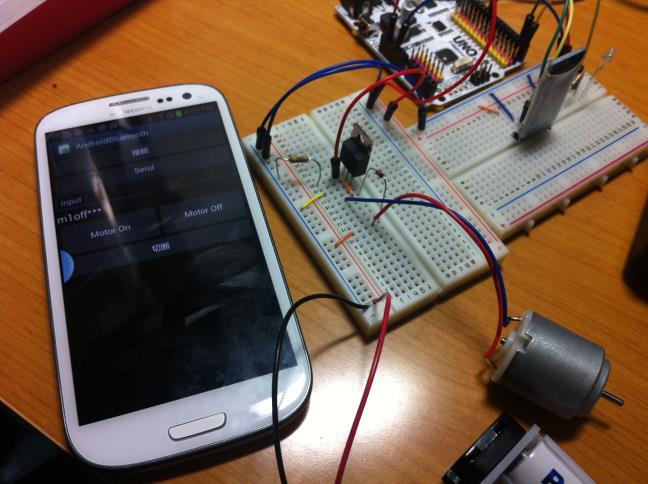
ちなみに、上の方に写っている白いボードは「Freaduino UNO Rev1.8」です。Arduino Uno にサーボ用のシールドを作るのが面倒で買ってしまいました。手元の meArm を制御している
Assembly | Adafruit 16-Channel Servo Driver with Arduino | Adafruit Learning System
https://learn.adafruit.com/16-channel-pwm-servo-driver/assembly
とは違うけどデジタルピンに1対1で対応しているので、Arudino IDE で Servo ライブラリがそのまま使えます。